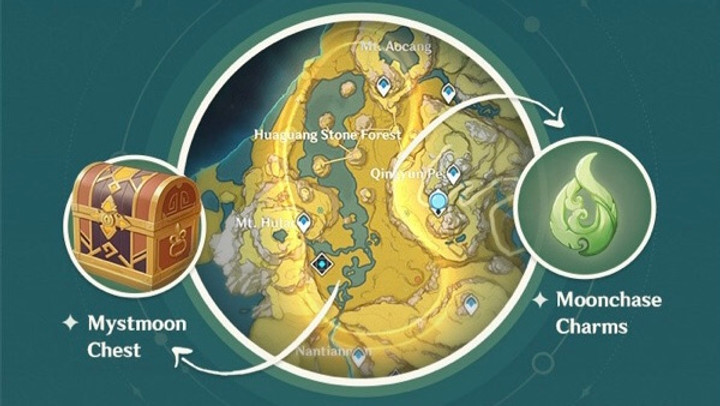
The latest Genshin Impact event, the Moonlight Merriment Festival, has reached its second phase, Moonlight Seeker, which was unlocked on 1st October at 4 am server time. Continuing the event’s storyline from Moonchase Tales, a brand new path, Path of Gentle Breezes, was also made available to travellers.
Travellers are sent on a treasure chest hunt in the Mondstadt region, where the Path of Gentle Breezes is hosted, travellers are on the hunt for Moonchase Charms and Mystmoon Chests to collect. As this region is most familiar to players when starting Genshin Impact, its locations should make locating these items straightforward.
Moonlight Seeker: The Path of Gentle Breezes explained
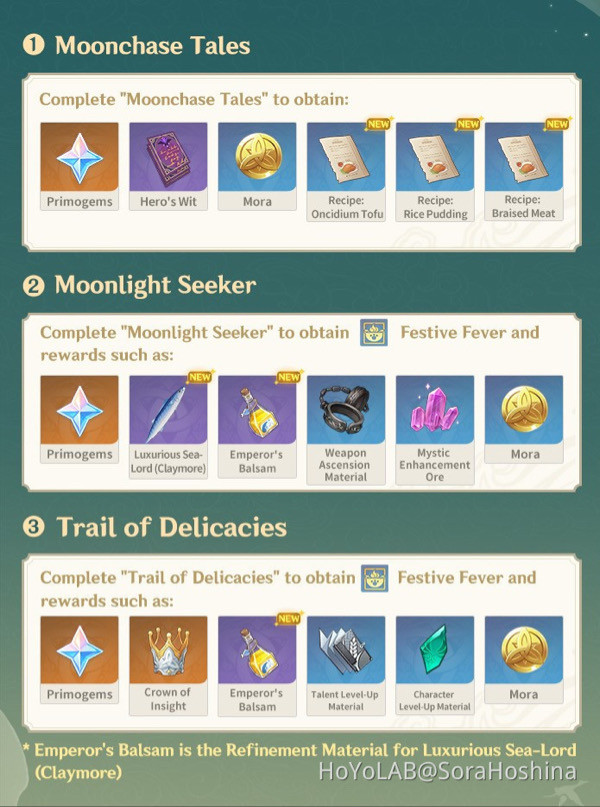
The Path of Gentle Breezes will require travellers to collect 30 Mystmoon Chests and 20 Moonchase Charms, unlike the previous path. While it does mean travellers will receive fewer Primogems on this path, however, travellers will be rewarded with the Emperor’s Balsam for their efforts.
Travellers can monitor their collection progress for a specific location by visiting the event page. As travellers reach a certain point in their progress bar, the rewards will be unlocked, which can be claimed from the event page.'
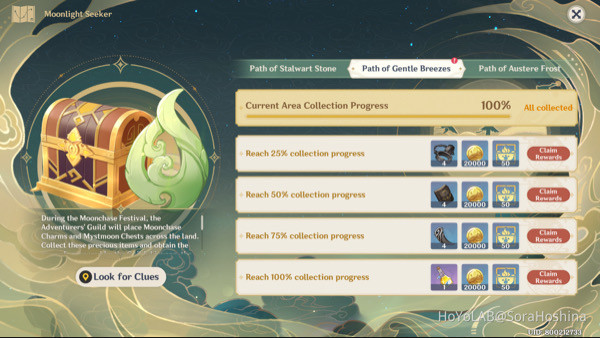
When collecting charms and chests in this event, travellers will need to start by looking for a marker belonging to the event organiser, Linyang in Liyue. While she won’t reveal the complete location, travellers can visit her once daily for a clue.
Moonlight Seeker: The Path of Gentle Breezes Moonchase Charms locations
As mentioned previously, there are a total of 20 charm locations spread throughout the three regions. Travellers can consult the official Genshin Impact Interactive Map for each location.
-
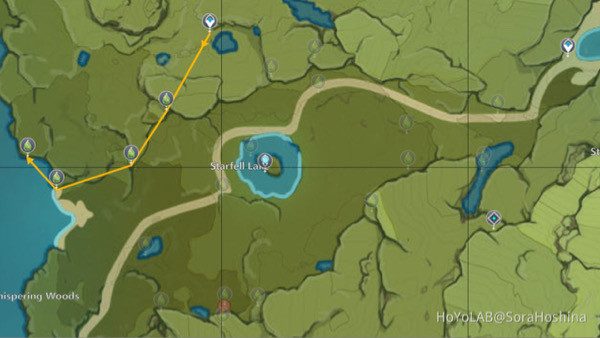
Starting in Starfell Valley, Mondstadt, travel to Teleport Waypoint, which from this location, go southwest. Drop down from the cliff and move to the left to find your 1st charm.
-
From the previous location, continue in this general direction where you can spot the 2nd charm just on the edge of the cliff.
-
Still moving southwest, glide to Cider Lake, where the 3rd charm is hidden on a ledge beyond another cliff.
-
From the ledge, jump into the waters behind and swim towards a boulder for the 4th charm.
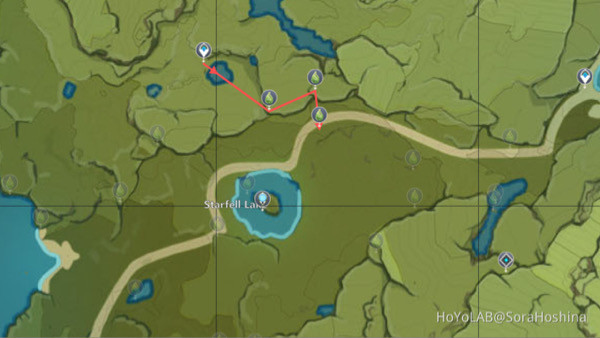
-
Travellers then make the journey back to the Telepoint Waypoint where you first started, only this time, move southeast. You will have some trees obstructing the view but just slightly to the right, on the edge of a cliff, is the 5th charm.
-
Moving east from the previous location, jump down near Stormbearer Mountain, where you can spot the 6th charm hiding on a ledge.
-
From here, make a 180 to face a tree when walking on its trunk; the 7th charm is found here.
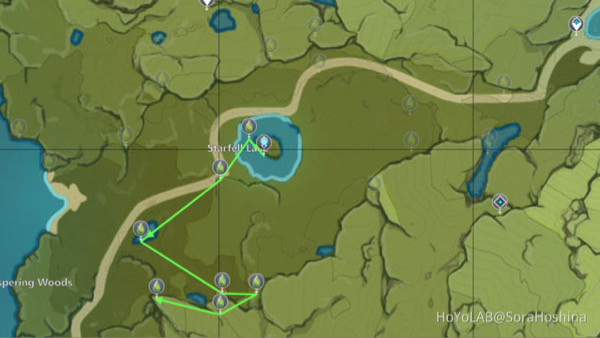
-
Teleport to the Statue of the Seven in Starfell Lake, where travellers travel west from this location before dropping down into the lake for the 8th charm.
-
Swim for the shore, where you can spot a damaged carriage. Walk inside for the 9th charm before gliding off the cliff nearby.
-
Once on land, continue west before gliding once again to find a charm hanging above a tree trunk. Collect the 10th charm and make a 180.
-
Head towards an encampment. Find the large building and climb onto the roof for the 11th charm.
-
Glide east off the roof onto a nearby ledge and climb to the top of the cliff. Once at the top, move north towards the edge where the 12th charm can be found mid-air.
-
While mid-air, glide back to the previous location, turning southwest for the 13th charm hidden amongst the trees.
-
From here, keep moving towards the cliff for the 14th charm.
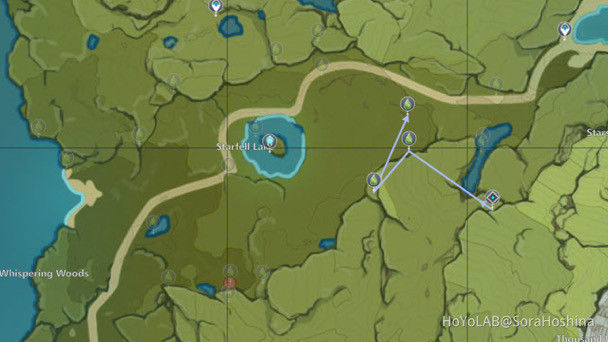
-
For the next few charms, travel to the Domain on Starsnatch Cliff and move northwest. The 15th charm is just past the edge of the cliff.
-
While gliding, make a U-turn back to your previous location and travel southwest before jumping down for the 16th charm.
-
Here, walk in the northeast direction, where you will need to climb a tree for the 17th charm.
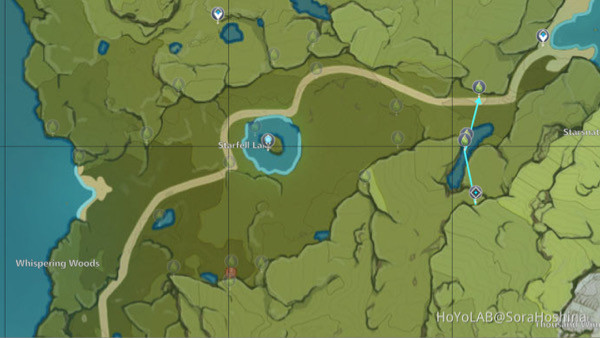
-
For the remaining charms, head back to the Domain location, only this time, travelling north in the direction of a waterfall. Just before the waterfall’s descent, the 18th charm can be found.
-
Go down the waterfall for the 19th charm.
-
Reach the bank of the waterfall, moving northeast and climb the nearest rock. Right beside the tree is the 20th and final charm.
Moonlight Seeker: The Path of Gentle Breezes Mystmoon Chests locations
As mentioned previously, there are a total of 30 chest locations spread throughout the three regions. Travellers can consult the official Genshin Impact Interactive Map for each location.
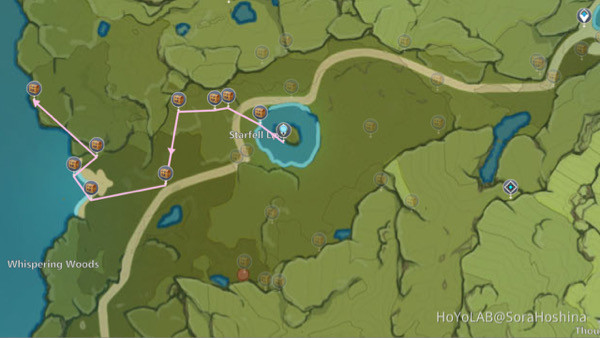
-
Starting from the Statue of the Seven in Starfell Lake, travel northwest from the location where the 1st chest can be spotted alongside the lake.
-
Move west from the previous location and climb the rock for the 2nd chest beside a tree.
-
Still moving in this direction, drop down behind a small cliff where you’ll find the 3rd chest right next to you.
-
Continuing west, you’ll find the 4th chest up against the cliff.
-
From the previous location, travel southwest into an open field where you can easily spot the 5th chest.
-
Here, travel in the direction of the nearby shore where the 6th chest is resting on the edge
-
Glide into the port in Cider Lake for the 7th chest and the 8th chest hiding behind a small tent nearby.
-
Ascend the cliff in the area and move northwest once you have reached the top. Jump down along the side of the cliff for the 9th chest.
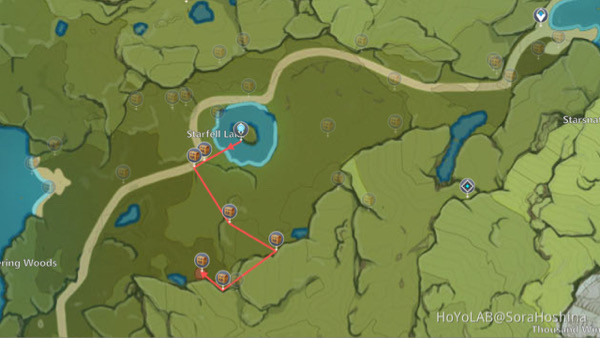
-
Travel back to the Statue of the Seven in Starfell Lake, where travellers are to travel southwest from this location, gliding over the lake to reach the shore. Head for the damaged carriage where the 10th chest is hidden in a bush next to the carriage.
-
Drop down onto a ledge for the 11th chest close by.
-
Move southeast from this location where the 12th chest is right in front of a rock, which you will need to climb and walk towards the 13th chest underneath a tree.
-
Here, travel towards the encampment southwest from the previous location with the 14th chest behind the large building.
-
Go inside this building for the 15th chest.
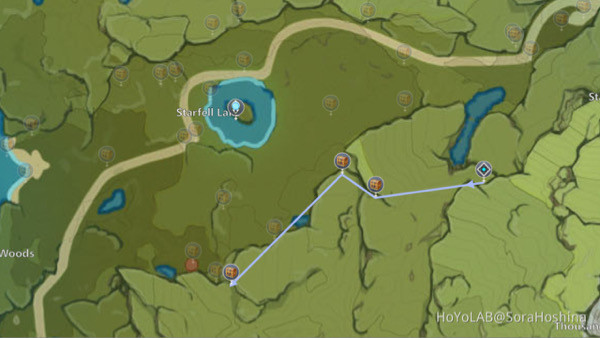
-
Travellers will now be heading to the Domain on Starsnatch Cliff and head west from the location. Beyond the tree, the 16th chest can be found in front of a rock.
-
From the previous location, continue travelling west, gliding off the cliff, where the 17th chest can be spotted on a rock.
-
Travel southwest before jumping down beside the cliff for the 18th chest.
The last few chests will see travellers starting once again from the Statue of the Seven in Starfell Lake.
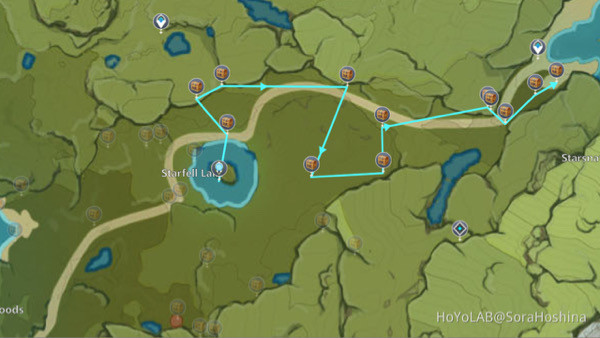
-
Head towards the lake and swim north to reach a rock where the 19th chest is found.
-
Move northwest from the previous location and climb the rock, which will lead you to the 20th chest nestled below the cliff.
-
From the previous location, climb the rock before moving east for the 21st chest.
-
Glide east from the previous location where the 22nd chest can be found hidden in a bush which is beside a tree.
-
Travellers will move southwest and glide down over some trees to reach the 23rd chest.
-
On foot, travel east from the previous location, where once you have spotted a boulder, the 24th chest can be seen next to it.
-
Head north from the last location, where on top of a hill is the 25th chest.
-
Travellers can see a cliff nearby for which you will need to climb. Once at the top, move northeast towards the 26th chest, which you will glide down for.
-
Climb another cliff upwards where the 27th chest is at the top.
-
Glide down south off the cliff where the 28th chest is seen hidden in a bush.
-
Glide in the northeast direction where the 29th and 30th chests are spotted close to each other.
Once travellers have collected all the charms and chests, they will receive all the rewards looted from the chests as well as the 100% collection progress in the event.
Don’t forget to check out our dedicated Genshin Impact section, where you can find all the news, guides and more.
Featured image courtesy of HoYoLAB.

 No ads, our video library,
