Halo Infinite multiplayer is right here! Even if leaks ruined the surprise for many during the Xbox 20th celebration stream, 343 Industries still shocked a lot of unaware fans with the shadow drop of the free-to-play component.
As thousands of new and old Spartans alike jump into the fray, the perennial question when it comes to any FPS comes to mind -- what are the best controller settings?
Halo is the quintessential controller FPS, and while mouse and keyboard are welcomed to the battlefield, those rocking the sticks will certainly feel way more at home in Halo Infinite and its robust customisation hub.
With all that said, let's take a look at our preferred settings based on experience, keeping in mind these might not work for everyone but they're definitely a great starting point.
Halo Infinite best button layout

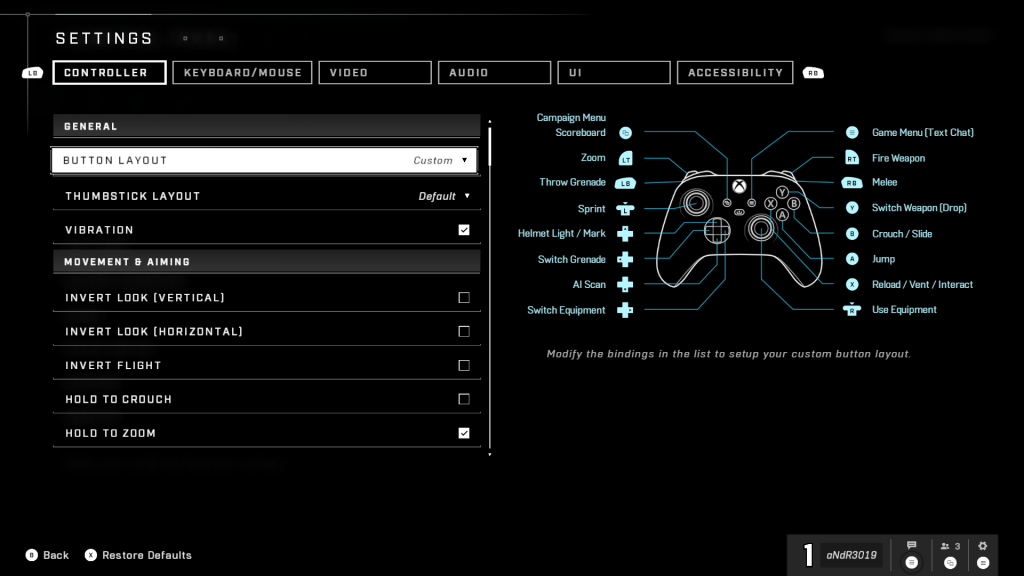
While there are many iconic controller layouts like Bumper Jumper and Recon still available, we believe a small tweak to the default button layout proves to be the most efficient one.
This is what we went with:
- LT: Zoom
- RT: Shoot
- LB: Throw Grenade
- RB: Melee
- L-stick: Sprint
- Y: Switch Weapon (Drop)
- B: Crouch
- X: Reload/Vent/Interact
- A: Jump
- D-pad Up: Helmet Light/Mark
- D-pad Left: Switch Grenade
- D-pad Right: Switch Equipment
- D-pad Down: AI Scan
As you can see, not much changes from the default but one exception -- the Melee button. For Halo players, old and new, having the Melee on the right-stick feels a bit unintuitive, whether you come from Halo 5 or Halo Master Chief Collection.
Many use RB as the default Melee button, with some sticking to a more classic B button usage; we recommend RB as it means you'll likely be able to keep your thumb on the stick while hitting your opponents.
The reason 343 Industries switched the Melee button is due to the introduction of equipment, which takes the RB slot in the default controllers. Now, you want that equipment in an accessible location in your layout, especially with things like the grappling hook, but overall, Melee just feels more in place being on the bumper button.
And yes, we're aware that using LT to zoom might seem alien to Halo veterans, but honestly, with how many modern FPS work, having it there isn't as big of a deal as you might think. You'll get used to it pretty quickly, and if you're new, you won't even know it's causing issues to fans of the series.
Halo Infinite best deadzone and sensitivity configuration

Another important part of the controller scheme is making sure your deadzone and sens are correct.
Deadzone allows for more responsiveness; as long as your sticks are not worn out, if you lower this number, the better they'll respond. Alternatively, increasing it means you'll have to make stronger motions for inputs to register.
Sensitivity, as always, is personal preference, although with slight aim assist in the controller, it's preferable to train with higher sensitivity, as 180-degree turns can become complicated against mouse and keyboard users.
This is our prefered selection based on our time with Halo Infinite:
- Move: Center Deadzone - 8
- Look: Center Deadzone - 8
- Move: Max Input Threshold - 0
- Look: Max Input Threshold - 10
- Move: Axial Deadzone: 8
- Look: Axial Deadzone - 0
- Look Acceleration: 5
- Look Sensitivity (Horizontal) - 6.5
- Look Sensitivity (Vertical) - 6.5
We tried not to mess too much with deadzones, lowering them just a bit for that extra responsiveness. As for the sens, like we said, we bumped it up to hit that sweet spot of rapidness and control.
There are plenty more options to mess around with, offering a seamless customisation experience, including the ability to maintain sprint after jumping or sliding, auto clamber, and step jumping toggled by default, something we highly recommend you leave as is.
And that's it! For more on all things Halo, check out our dedicated section filled with news, guides, and more.
Featured image courtesy of 343 Industries.

 No ads, our video library,

